
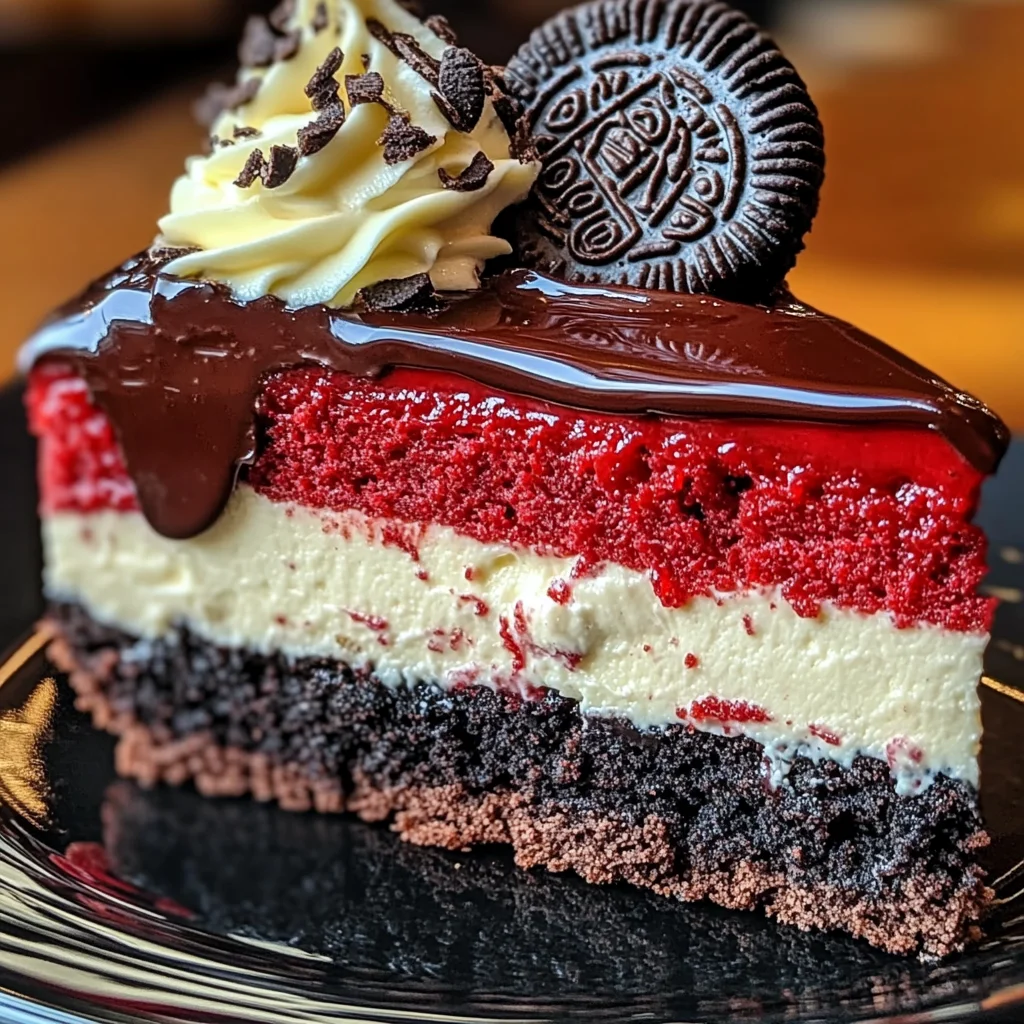
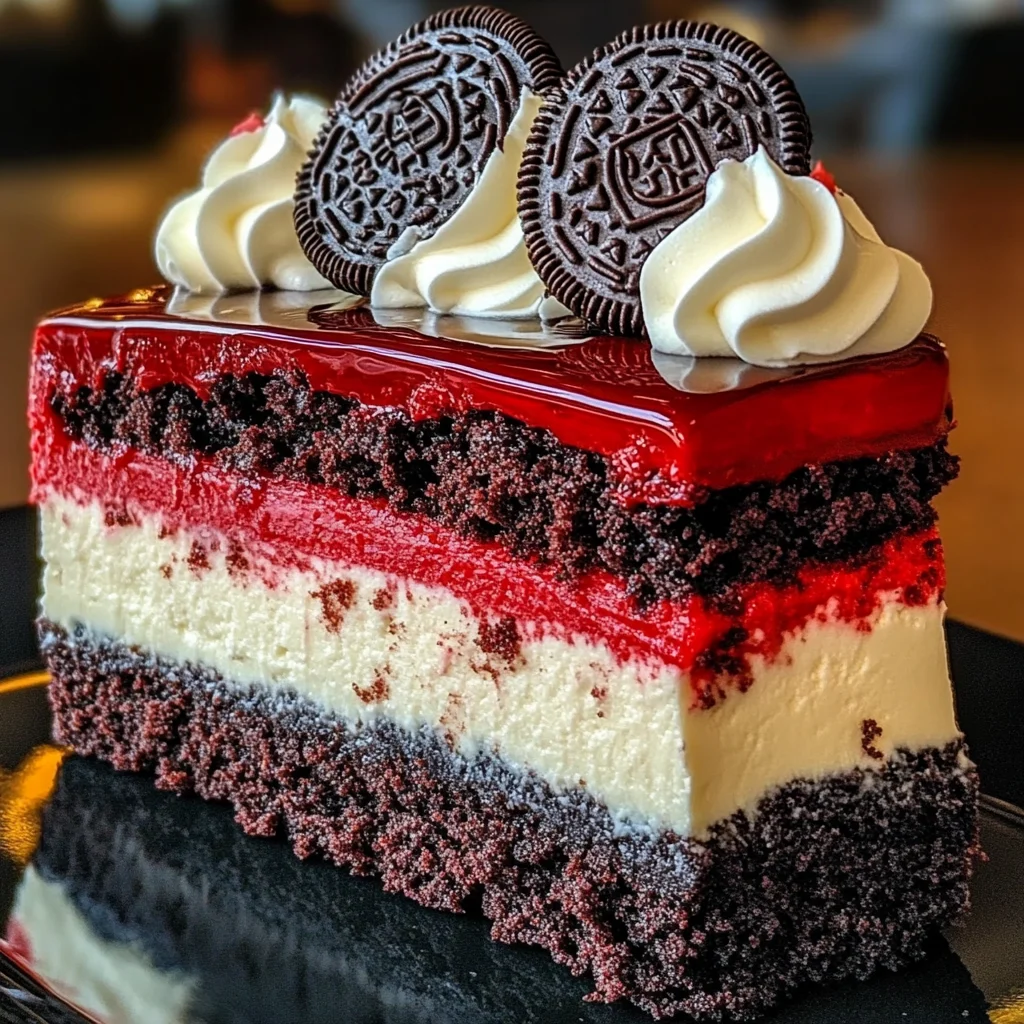
This Red Velvet Oreo Cheesecake is an indulgent dessert that combines a crunchy Oreo crust with rich layers of creamy red velvet and vanilla cheesecake. It’s perfect for birthdays, anniversaries, or any time you’re in the mood for something spectacular. With its vibrant color and decadent flavor, this cheesecake is sure to impress your guests and satisfy your sweet tooth!
Why You’ll Love This Recipe
- Stunning Appearance: The combination of red velvet and chocolate ganache creates a beautiful dessert that looks as good as it tastes.
- Rich Flavor: The creamy texture of the cheesecake paired with the crunch of the Oreo crust offers a delightful contrast.
- Versatile Dessert: Perfect for special occasions or casual gatherings, this cheesecake fits any celebration.
- Make Ahead Option: Prepare it a day in advance for stress-free entertaining without sacrificing quality.
- Easy to Follow: With straightforward steps, even novice bakers can create this delicious treat.
Tools and Preparation
To make this Red Velvet Oreo Cheesecake, you will need some essential kitchen tools to ensure success.
Essential Tools and Equipment
- Springform pan
- Mixing bowls
- Electric mixer
- Rubber spatula
- Parchment paper
Importance of Each Tool
- Springform pan: Allows for easy removal of the cheesecake without damaging its delicate structure.
- Electric mixer: Ensures that the cream cheese is whipped smoothly, creating a light and fluffy filling.
- Rubber spatula: Ideal for scraping down bowls and ensuring all ingredients are fully incorporated.
Ingredients
For the Crust
- 2 ½ cups Oreo cookie crumbs (about 25-30 cookies, crushed)
- 5 tbsp unsalted butter, melted
For the Red Velvet Layer
- 16 oz (2 blocks) cream cheese, softened
- ¾ cup granulated sugar
- ¼ cup sour cream
- 2 large eggs
- 1 ½ tbsp cocoa powder
- 1 ½ tsp alcohol-free vanilla extract
- 1 tbsp red food coloring
For the Vanilla Layer
- 16 oz (2 blocks) cream cheese, softened
- ¾ cup granulated sugar
- ¼ cup sour cream
- 2 large eggs
- 1 ½ tsp alcohol-free vanilla extract
For the Ganache Topping
- ½ cup heavy cream
- ¾ cup semi-sweet chocolate chips
To Garnish
- Whipped cream
- Oreo cookie crumbs
- Whole Oreos
How to Make Red Velvet Oreo Cheesecake
Step 1: Preheat the Oven
Preheat your oven to 325°F (163°C). Grease a 9-inch springform pan and line the bottom with parchment paper. This will help prevent sticking.
Step 2: Prepare the Crust
- In a mixing bowl, combine the Oreo cookie crumbs with melted butter until well mixed.
- Press this mixture into the bottom of the prepared springform pan evenly.
- Bake for 8-10 minutes until set, then remove from the oven and let it cool.
Step 3: Make the Red Velvet Layer
- In a large bowl, beat together softened cream cheese and granulated sugar until smooth.
- Add in sour cream, eggs, cocoa powder, alcohol-free vanilla extract, and red food coloring. Mix until fully combined.
- Pour this red velvet batter onto the cooled crust and spread evenly.
Step 4: Make the Vanilla Layer
- In another bowl, beat together softened cream cheese and granulated sugar until smooth.
- Add in sour cream, eggs, and alcohol-free vanilla extract; mix until fully combined.
- Carefully pour over the red velvet layer, smoothing out the top gently.
Step 5: Bake
Place in the oven at 325°F (163°C) and bake for about 50-60 minutes. The edges should be set while the center remains slightly jiggly.
Step 6: Cool Down
Turn off your oven after baking but leave the cheesecake inside with the door slightly ajar for one hour to cool gradually.
Step 7: Chill
Transfer to your refrigerator and chill for at least six hours or overnight for best results.
Step 8: Prepare Ganache
- Heat heavy cream in a saucepan until it’s hot but not boiling.
- Pour over chocolate chips in a bowl; let sit for two minutes before stirring until smooth.
Step 9: Assemble
Let ganache cool slightly before pouring it over your chilled cheesecake. Spread evenly across the top.
Step 10: Garnish
Pipe whipped cream around edges of the cheesecake, sprinkle with additional Oreo crumbs, and decorate with whole Oreos on top.
Step 11: Serve
Slice your cheesecake into pieces and serve chilled. Enjoy this delightful Red Velvet Oreo Cheesecake!
How to Serve Red Velvet Oreo Cheesecake
This Red Velvet Oreo Cheesecake is not only a treat for the taste buds but also a feast for the eyes. Here are some delightful serving suggestions to elevate your dessert experience.
With Fresh Berries
- Serve slices with an assortment of fresh strawberries, raspberries, or blueberries for a vibrant contrast and added freshness.
Drizzled with Caramel Sauce
- A drizzle of warm caramel sauce on top adds an extra layer of sweetness that complements the rich flavors of the cheesecake.
Accompanied by Vanilla Ice Cream
- Pairing each slice with a scoop of creamy vanilla ice cream creates a luscious combination that’s hard to resist.
Garnished with Mint Leaves
- Add a few fresh mint leaves on top for a touch of color and a refreshing hint that balances the sweetness.
Alongside Coffee or Tea
- Serving this cheesecake with a cup of coffee or herbal tea enhances its flavor profile and makes for a perfect end to any meal.
How to Perfect Red Velvet Oreo Cheesecake
Creating the perfect Red Velvet Oreo Cheesecake requires attention to detail. Here are some essential tips to help you achieve cheesecake perfection.
- Use room temperature ingredients: Ensure that your cream cheese and eggs are at room temperature for easier mixing and a smoother texture.
- Do not overmix: Mix just until combined to avoid incorporating too much air, which can lead to cracks in the cheesecake.
- Bake in a water bath: Place your springform pan in a larger pan filled with water while baking. This helps regulate temperature and prevents cracking.
- Cool gradually: Allow the cheesecake to cool in the oven with the door slightly ajar. This gradual cooling helps prevent sudden temperature changes that can cause cracks.
- Chill overnight: For best results, refrigerate the cheesecake overnight. This allows all the flavors to meld together beautifully.
- Add toppings just before serving: To maintain freshness, add any whipped cream or garnishes right before serving.
Best Side Dishes for Red Velvet Oreo Cheesecake
Pairing side dishes with your Red Velvet Oreo Cheesecake can enhance the overall dining experience. Here are some delightful options:
- Fruit Salad: A light fruit salad made with seasonal fruits offers a refreshing contrast to the richness of the cheesecake.
- Chocolate Mousse: Light and airy chocolate mousse adds an indulgent touch without overwhelming flavors.
- Pecan Pie Bars: These sweet bars provide a crunchy texture and nutty flavor that complements the smooth cheesecake.
- Lemon Sorbet: The tartness of lemon sorbet cleanses the palate and balances out the sweetness of the dessert.
- Cheese Platter: A selection of cheeses, such as brie or gouda, pairs wonderfully with dessert grape juice with vinegar or coffee alongside the cake.
- Baked Apples: Warm baked apples sprinkled with cinnamon offer cozy flavors that harmonize well with red velvet notes.
Common Mistakes to Avoid
When making Red Velvet Oreo Cheesecake, it’s easy to overlook a few key details. Here are some common mistakes and tips to ensure your cheesecake turns out perfectly.
- Incorrect oven temperature: Baking at the wrong temperature can lead to an unevenly cooked cheesecake. Always use an oven thermometer to verify the actual temperature.
- Skipping the cooling step: Don’t rush the cooling process in the oven. Allowing your cheesecake to cool gradually helps prevent cracks on the surface.
- Not chilling long enough: For the best texture, make sure to chill your cheesecake for at least 6 hours or overnight before serving. This ensures it firms up properly.
- Overmixing the batter: Mixing too much can incorporate excess air, leading to cracks while baking. Mix until just combined for a smooth texture.
- Using cold ingredients: Make sure all your ingredients, especially cream cheese and eggs, are at room temperature before mixing. This helps achieve a creamy consistency.
Refrigerator Storage
- item Store leftovers in an airtight container in the refrigerator.
- item The cheesecake will last for about 3-5 days when stored correctly.
Freezing Red Velvet Oreo Cheesecake
- item Wrap individual slices tightly in plastic wrap and then in aluminum foil.
- item The cheesecake can be frozen for up to 2-3 months, ensuring maximum freshness.
Reheating Red Velvet Oreo Cheesecake
- Oven: Preheat your oven to 250°F (121°C). Place the cheesecake on a baking sheet and heat for about 10-15 minutes until warmed through.
- Microwave: Heat individual slices on a microwave-safe plate for 20-30 seconds. Be cautious not to overheat.
- Stovetop: Place a slice in a pan over low heat, covered with a lid, for about 5 minutes until warm.
Frequently Asked Questions
What is Red Velvet Oreo Cheesecake?
Red Velvet Oreo Cheesecake is a decadent dessert combining layers of red velvet cheesecake and classic vanilla cheesecake on an Oreo crust.
Can I make this recipe without food coloring?
Yes! You can omit the red food coloring if you prefer a traditional white cheesecake or want a more subtle flavor.
How do I prevent my cheesecake from cracking?
To avoid cracks, ensure you don’t overmix your batter and follow the cooling instructions carefully. A water bath during baking can also help maintain moisture.
How should I serve Red Velvet Oreo Cheesecake?
This dessert is best served chilled, topped with whipped cream and additional Oreo crumbs or whole Oreos for decoration.
Can I customize my Red Velvet Oreo Cheesecake?
Absolutely! Feel free to add chocolate chips or different flavored extracts to enhance your cheesecake’s taste according to your preference.
Final Thoughts
This Red Velvet Oreo Cheesecake is not only visually stunning but also rich in flavor, making it perfect for any occasion. Its versatility allows you to customize it with various toppings or flavors, ensuring there’s something for everyone. Try this recipe today and indulge in its creamy goodness!

Red Velvet Oreo Cheesecake
Indulge in the delightful Red Velvet Oreo Cheesecake, a stunning dessert that combines a rich, velvety red velvet layer with a smooth vanilla cheesecake, all resting on a crunchy Oreo crust. This show-stopping cake is perfect for birthdays, anniversaries, or any celebration where you want to impress your guests. The creamy texture and vibrant color make it not just delicious but also visually appealing, ensuring it will be the highlight of your dessert table. With straightforward preparation steps and a make-ahead option, this cheesecake is as easy to create as it is enjoyable to eat.
- Total Time: 1 hour 30 minutes
- Yield: Serves approximately 12 slices 1x
Ingredients
- 2 ½ cups Oreo cookie crumbs
- 5 tbsp unsalted butter
- 32 oz cream cheese
- 1 ½ cups granulated sugar
- ½ cup sour cream
- 4 large eggs
- 1 ½ tbsp cocoa powder
- 2 ½ tsp vanilla extract
- ⅓ cup red food coloring
- ½ cup heavy cream
- ¾ cup semi-sweet chocolate chips
Instructions
- Preheat the oven to 325°F (163°C). Grease a springform pan and line it with parchment paper.
- Mix Oreo crumbs with melted butter and press into the bottom of the prepared pan. Bake for 8–10 minutes and cool.
- For the red velvet layer, beat cream cheese and sugar until smooth. Add sour cream, eggs, cocoa powder, vanilla extract, and red food coloring; mix until combined. Pour over cooled crust.
- For the vanilla layer, repeat the mixing process without cocoa powder or food coloring; pour over red velvet layer.
- Bake for about 50–60 minutes until edges are set and center is slightly jiggly. Cool gradually in the oven for an hour.
- Chill in the refrigerator for at least six hours or overnight.
- Prepare ganache by heating heavy cream and pouring over chocolate chips; stir until smooth.
- Pour ganache over chilled cheesecake and garnish as desired before serving.
- Prep Time: 30 minutes
- Cook Time: 60 minutes
- Category: Dessert
- Method: Baking
- Cuisine: American
Nutrition
- Serving Size: 1 slice (100g)
- Calories: 320
- Sugar: 24g
- Sodium: 250mg
- Fat: 22g
- Saturated Fat: 12g
- Unsaturated Fat: 10g
- Trans Fat: 0g
- Carbohydrates: 30g
- Fiber: 1g
- Protein: 6g
- Cholesterol: 85mg

Leave a Comment